Blog with Flask and Bootstrap template
For small personalized sites, Flask is easy and simple。
? I am new to Flask.?
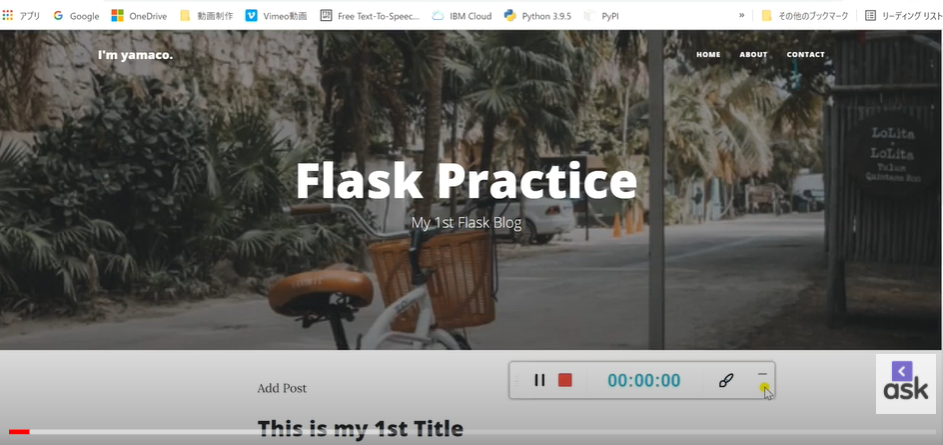
完成物
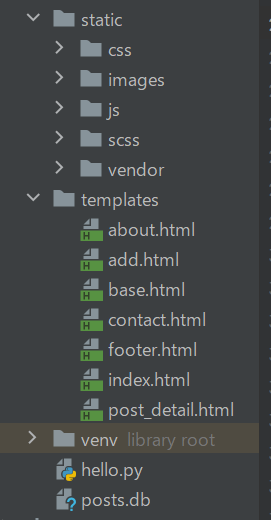
Folder Structure
Create a css, images, js, scss, vendor folder in the “static folder” respectively, and a separate “templates folder” on the same level as the (static folder).
Database Model and Submission Form
from flask import Flask, render_template, request, redirect, url_for
from flask_bootstrap import Bootstrap
from flask_ckeditor import CKEditor, CKEditorField
from flask_sqlalchemy import SQLAlchemy
from flask_wtf import FlaskForm

from wtforms import StringField, SubmitField
from wtforms.validators import DataRequired, URL

app = Flask(__name__)
app.config['SECRET_KEY'] = 'INeedSomeCheeseCake'
ckeditor = CKEditor(app)
Bootstrap(app)

# データベース作成
app.config['SQLALCHEMY_DATABASE_URI'] = "sqlite:///posts.db"
app.config['SQLALCHEMY_TRACK_MODIFICATIONS'] = False
db = SQLAlchemy(app)

# データベースモデル
class Post(db.Model):
    id = db.Column(db.Integer, primary_key=True)
    title = db.Column(db.String(100), unique=True, nullable=False)
    subtitle = db.Column(db.String(100), unique=True, nullable=False)
    body = db.Column(db.Text(250), unique=True, nullable=False)
    img_url = db.Column(db.String(250), nullable=False)

# 初回作成時のみ(2回目以降はコメントアウト・又は削除しておく)
db.create_all()

# データベースに合わせて投稿フォーム作成
class PostForm(FlaskForm):
    title = StringField('Post Title', validators=[DataRequired()])
    subtitle = StringField("Subtitle", validators=[DataRequired()])
    body = CKEditorField("Body", validators=[DataRequired()])
    img_url = StringField("Image URL", validators=[DataRequired(), URL()])
    submit = SubmitField('Submit')

# 開発用デバッグモード
if __name__ == "__main__":
    app.run(debug=True)
SQLite (for Windows) Installing procedure
Version used in this project
pip3 install sqlalchemy==1.3.23
pip3 install Flask-SQLAlchemy==2.4.4
List and detail display settings
# 省略
# 投稿一覧設定
@app.route("/")
def get_all_posts():
    all_posts = db.session.query(Post).all()
    return render_template("index.html", posts=all_posts)

# 投稿詳細
@app.route("/post_detail/<int:post_id>")
def post_detail(post_id):
    requested_post = Post.query.get(post_id)
    return render_template("post_detail.html", post=requested_post)

# 省略
Download the template and add it to the folder
Click here for template: Bootstrap “Clean Blog” template
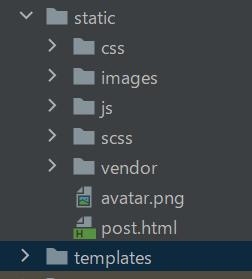
base.html, index.html, footer.html
Tweak index.html to create the above three html files。
First, set up the favicon:無料favicon作成
<!DOCTYPE html>
<html lang="ja">
    <head>
        <meta charset="utf-8" />
        <meta name="viewport" content="width=device-width, initial-scale=1, shrink-to-fit=no" />
        <title>yamaco's Blog</title>
        <link rel="icon" type="image/x-icon" href="static/images/favicon.ico" />

        <link href="{{ url_for('static', filename='vendor/bootstrap/css/bootstrap.min.css') }}" rel="stylesheet">

 <!-- Custom fonts for this template -->
        <link href="{{ url_for('static', filename='vendor/fontawesome-free/css/all.min.css')}}" rel="stylesheet" type="text/css">
        <link href='https://fonts.googleapis.com/css?family=Lora:400,700,400italic,700italic' rel='stylesheet' type='text/css'>
        <link href='https://fonts.googleapis.com/css?family=Open+Sans:300italic,400italic,600italic,700italic,800italic,400,300,600,700,800' rel='stylesheet' type='text/css'>

  <!-- Custom styles for this template -->
        <link href="{{ url_for('static', filename='css/clean-blog.min.css')}}" rel="stylesheet">
    </head>

    <body>

  <!-- Navigation -->
  <nav class="navbar navbar-expand-lg navbar-light fixed-top" id="mainNav">
      <div class="container">
          <a class="navbar-brand" href="{{url_for('get_all_posts')}}">I'm yamaco.</a>
          <button class="navbar-toggler navbar-toggler-right" type="button" data-toggle="collapse" data-target="#navbarResponsive" aria-controls="navbarResponsive" aria-expanded="false" aria-label="Toggle navigation">
            Menu
            <i class="fas fa-bars"></i>
          </button>
          <div class="collapse navbar-collapse" id="navbarResponsive">
                <ul class="navbar-nav ml-auto">
                  <li class="nav-item">
                    <a class="nav-link" href="/">Home</a>
                  </li>
                  <li class="nav-item">
                    <a class="nav-link" href="/about">About</a>
                  </li>
                  <li class="nav-item">
                    <a class="nav-link" href="/contact">Contact</a>
                  </li>
                </ul>
          </div>
    </div>
  </nav>
{% include "base.html" %}
        <!-- Page Header-->
        <header class="masthead" style="background-image: url({{ url_for('static', filename='images/dream.jpg')}})">
            <div class="container position-relative px-4 px-lg-5">
                <div class="row gx-4 gx-lg-5 justify-content-center">
                    <div class="col-md-10 col-lg-8 col-xl-7">
                        <div class="site-heading">
                            <h1>Flask Practice</h1>
                            <span class="subheading">My 1st Flask Blog</span>
                        </div>
                    </div>
                </div>
            </div>
        </header>
        <!-- Main Content-->

        <div class="container px-4 px-lg-5">
            <div class="row gx-4 gx-lg-5 justify-content-center">
                <div class="col-md-10 col-lg-8 col-xl-7">
                    <a href="{{ url_for('add') }}">Add Post</a>
                    <!-- Post preview-->
                    {% for post in posts %}
                    <div class="post-preview">
                        <a href="{{ url_for('post_detail', post_id=post.id) }}">
                            <h2 class="post-title">{{ post.title }}</h2>
                            <h3 class="post-subtitle">{{ post.subtitle }}</h3>
                            <a href="{{ url_for('post_detail', post_id=post.id) }}">Detail</a>
                        </a>
                    </div>
                     <hr class="my-4" />
                    {% endfor %}
                    <!-- Divider-->
                    <!-- Pager-->
                    <div class="d-flex justify-content-end mb-4"><a class="btn btn-primary text-uppercase" href="#!">Older Posts →</a></div>
                </div>
            </div>
        </div>

{% include "footer.html" %}
<!-- Footer-->
        <footer class="border-top">
            <div class="container px-4 px-lg-5">
                <div class="row gx-4 gx-lg-5 justify-content-center">
                    <div class="col-md-10 col-lg-8 col-xl-7">
                        <ul class="list-inline text-center">
                            <li class="list-inline-item">
                                <a href="#!">
                                    <span class="fa-stack fa-lg">
                                        <i class="fas fa-circle fa-stack-2x"></i>
                                        <i class="fab fa-twitter fa-stack-1x fa-inverse"></i>
                                    </span>
                                </a>
                            </li>
                            <li class="list-inline-item">
                                <a href="#!">
                                    <span class="fa-stack fa-lg">
                                        <i class="fas fa-circle fa-stack-2x"></i>
                                        <i class="fab fa-facebook-f fa-stack-1x fa-inverse"></i>
                                    </span>
                                </a>
                            </li>
                            <li class="list-inline-item">
                                <a href="#!">
                                    <span class="fa-stack fa-lg">
                                        <i class="fas fa-circle fa-stack-2x"></i>
                                        <i class="fab fa-github fa-stack-1x fa-inverse"></i>
                                    </span>
                                </a>
                            </li>
                        </ul>
                        <div class="small text-center text-muted fst-italic">Copyright © Your Website 2021</div>
                    </div>
                </div>
            </div>
        </footer>
        <!-- Bootstrap core JS-->
        <script src="https://cdn.jsdelivr.net/npm/bootstrap@5.1.0/dist/js/bootstrap.bundle.min.js"></script>
        <!-- Core theme JS-->
        <script src="static/js/scripts.js"></script>
    </body>
Create a post detail page
Images are image links from unsplash.
The key is that the url setting is url(‘{{ post.img_url }}’), not from static. It is retrieving the URL stored in the database.
{% include "base.html" %}
        <!-- Page Header-->
        <header class="masthead" style="background-image: url('{{ post.img_url }}')">
            <div class="container position-relative px-4 px-lg-5">
                <div class="row gx-4 gx-lg-5 justify-content-center">
                    <div class="col-md-10 col-lg-8 col-xl-7">
                        <div class="post-heading">
                            <h1>{{ post.title }}</h1>
                            <h2 class="subheading">{{ post.subtitle }}</h2>
                            <span class="meta">
                                Posted by yamaco
                            </span>
                        </div>
                    </div>
                </div>
            </div>
        </header>
        <!-- Post Content-->
        <article>
            <div class="container">
                <div class="row">
                <div class="col-lg-8 col-md-10 mx-auto">
                    {{ post.body|safe }}<hr>
                    <div class="clearfix">
                  <a class="btn btn-primary float-right" href="{{url_for('edit_post', post_id=post.id)}}">Edit Post</a>
                </div>
                </div>
              </div>
            </div>
        </article>

        <hr>
        <!-- Footer-->
        {% include "footer.html" %}
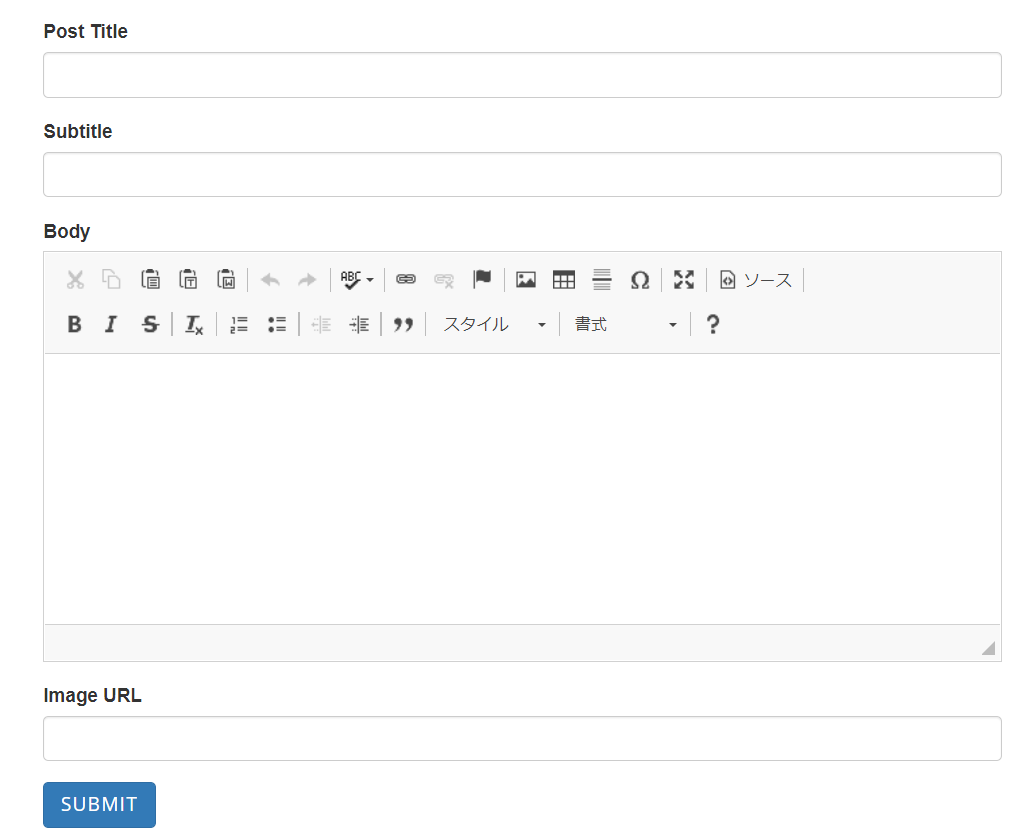
New Post / Edit Post
Use add.html to create and edit
Since “about” and “contact” are available in the Bootstrap Navbar, we will set them incidentally.
# 省略

@app.route("/add", methods=["GET", "POST"])
def add():
    form = PostForm()
    if request.method == "POST":
        form = PostForm()
        if form.validate_on_submit():
            new_post = Post(
                title=request.form["title"],
                subtitle=request.form["subtitle"],
                body=request.form["body"],
                img_url=request.form["img_url"]
            )
            db.session.add(new_post)
            db.session.commit()
            return redirect(url_for('get_all_posts'))
    posts = Post.query.all()
    return render_template("add.html", form=form, posts=posts)

# 編集したい記事のidを取得して、上記の「add」上で編集します
@app.route("/edit-post/<int:post_id>", methods=["GET", "POST"])
def edit_post(post_id):
    post = Post.query.get(post_id)
    edit_form = PostForm(
        title=post.title,
        subtitle=post.subtitle,
        img_url=post.img_url,
        body=post.body
    )
    if edit_form.validate_on_submit():
        post.title = edit_form.title.data
        post.subtitle = edit_form.subtitle.data
        post.img_url = edit_form.img_url.data
        post.body = edit_form.body.data
        db.session.commit()
        return redirect(url_for("post_detail", post_id=post.id))
    return render_template("add.html", form=edit_form, is_edit=True)


@app.route("/about")
def about():
    return render_template("about.html")


@app.route("/contact")
def contact():
    return render_template("contact.html")

# 省略
The same template is used for new posts and for editing posts.
{% if is_edit: %} {% else: %} to branch conditionally and assign whether it is new or edited.
I use Flask-wtf and CKEditor
$ pip install Flask-WTF
CKEditor makes the posting and editing screens cool and easy to use.
{% include "base.html" %}
        <!-- Page Header-->
        <header class="masthead" style="background-image: url({{ url_for('static', filename='images/edit.jpg')}})">
            <div class="container position-relative px-4 px-lg-5">
                <div class="row gx-4 gx-lg-5 justify-content-center">
                    <div class="col-md-10 col-lg-8 col-xl-7">
                        <div class="site-heading">
                            <div class="col-lg-8 col-md-10 mx-auto">
                              <div class="page-heading">
                                {% if is_edit: %}
                                <h1>Edit Post</h1>
                                {% else: %}
                                <h1>New Post</h1>
                                {% endif %}
                                <span class="subheading">You're adding a great post!!</span>
                              </div>
                            </div>
                        </div>
                    </div>
                </div>
            </div>
        </header>
        <!-- Main Content-->
{% include "bootstrap/base.html" %}
{% import "bootstrap/wtf.html" as wtf %}
{% block content %}
        <div class="container px-4 px-lg-5">
            <div class="row gx-4 gx-lg-5 justify-content-center">
              <div class="container">
                <div class="row">
                  <div class="col-lg-8 col-md-10 mx-auto">
                    {{ ckeditor.load() }}
                    {{ ckeditor.config(name='body') }}
                    {{ wtf.quick_form(form, novalidate=True, button_map={"submit": "primary"}) }}
                  </div>
                </div>
              </div>
                     <hr class="my-4" />
                    <!-- Divider-->
                    <!-- Pager-->
                    <div class="d-flex justify-content-end mb-4"><a class="btn btn-primary text-uppercase" href="#!">Older Posts →</a></div>
                </div>
            </div>
        </div>
{% endblock %}
{% include "footer.html" %}
Delete Post
After the post is deleted, it redirects to the post list page.
# 省略

@app.route("/delete/<int:post_id>")
def delete_post(post_id):
    post_to_delete = Post.query.get(post_id)
    db.session.delete(post_to_delete)
    db.session.commit()
    return redirect(url_for('get_all_posts'))

# 省略
Add delete link to index.html
                    {% for post in posts %}
                    <div class="post-preview">
                        <a href="{{ url_for('post_detail', post_id=post.id) }}">
                            <h2 class="post-title">{{ post.title }}</h2>
                            <h3 class="post-subtitle">{{ post.subtitle }}</h3>
                            <a href="{{ url_for('post_detail', post_id=post.id) }}">Detail</a>
                        </a>
                        <p>Posted by yamaco
                        <a href="{{url_for('delete_post', post_id=post.id) }}">Delete</a> # ここら辺に追加
                        </p>
                    </div>
                     <hr class="my-4" />
                    {% endfor %}
about.html, contact.html
Contents, untouched, but looks OK.
{% include "base.html" %}
        <!-- Page Header-->
        <header class="masthead" style="background-image: url({{ url_for('static', filename='images/about.jpg')}})">
            <div class="container position-relative px-4 px-lg-5">
                <div class="row gx-4 gx-lg-5 justify-content-center">
                    <div class="col-md-10 col-lg-8 col-xl-7">
                        <div class="page-heading">
                            <h1>About Me</h1>
                            <span class="subheading">This is what I do.</span>
                        </div>
                    </div>
                </div>
            </div>
        </header>
        <!-- Main Content-->
        <main class="mb-4">
            <div class="container px-4 px-lg-5">
                <div class="row gx-4 gx-lg-5 justify-content-center">
                    <div class="col-md-10 col-lg-8 col-xl-7">
                        <p>Lorem ipsum dolor sit amet, consectetur adipisicing elit. Saepe nostrum ullam eveniet pariatur voluptates odit, fuga atque ea nobis sit soluta odio, adipisci quas excepturi maxime quae totam ducimus consectetur?</p>
                        <p>Lorem ipsum dolor sit amet, consectetur adipisicing elit. Eius praesentium recusandae illo eaque architecto error, repellendus iusto reprehenderit, doloribus, minus sunt. Numquam at quae voluptatum in officia voluptas voluptatibus, minus!</p>
                        <p>Lorem ipsum dolor sit amet, consectetur adipisicing elit. Aut consequuntur magnam, excepturi aliquid ex itaque esse est vero natus quae optio aperiam soluta voluptatibus corporis atque iste neque sit tempora!</p>
                    </div>
                </div>
            </div>
        </main>
        <!-- Footer-->
  {% include "footer.html" %}
I will try to add the inquiry function at a later date.
This time, just the layout.
{% include "base.html" %}
        <!-- Page Header-->
  <header class="masthead" style="background-image: url({{ url_for('static', filename='images/contact.jpg')}})">
    <div class="overlay"></div>
    <div class="container">
      <div class="row">
        <div class="col-lg-8 col-md-10 mx-auto">
          <div class="page-heading">
            {% if msg_sent: %}
            <h1>Successfully sent your message</h1>
            {% else: %}
            <h1>Contact Me</h1>
            {% endif %}
            <span class="subheading">Let's keep in touch.</span>
          </div>
        </div>
      </div>
    </div>
  </header>
        <!-- Main Content-->
  <div class="container">
    <div class="row">
      <div class="col-lg-8 col-md-10 mx-auto">
        <p>Want to get in touch? Fill out the form below to send me a message and I will get back to you as soon as possible!</p>
        <!-- Contact Form - Enter your email address on line 19 of the mail/contact_me.php file to make this form work. -->
        <!-- WARNING: Some web hosts do not allow emails to be sent through forms to common mail hosts like Gmail or Yahoo. It's recommended that you use a private domain email address! -->
        <!-- To use the contact form, your site must be on a live web host with PHP! The form will not work locally! -->
        <form name="sentMessage" id="contactForm" action="{{ url_for('contact') }}" method="post" novalidate>
          <div class="control-group">
            <div class="form-group floating-label-form-group controls">
              <label>Name</label>
              <input type="text" name="name" class="form-control" placeholder="Name" id="name" required data-validation-required-message="Please enter your name.">
              <p class="help-block text-danger"></p>
            </div>
          </div>
          <div class="control-group">
            <div class="form-group floating-label-form-group controls">
              <label>Email Address</label>
              <input type="email" name="email" class="form-control" placeholder="Email Address" id="email" required data-validation-required-message="Please enter your email address.">
              <p class="help-block text-danger"></p>
            </div>
          </div>
          <div class="control-group">
            <div class="form-group col-xs-12 floating-label-form-group controls">
              <label>Phone Number</label>
              <input type="tel" name="phone" class="form-control" placeholder="Phone Number" id="phone" required data-validation-required-message="Please enter your phone number.">
              <p class="help-block text-danger"></p>
            </div>
          </div>
          <div class="control-group">
            <div class="form-group floating-label-form-group controls">
              <label>Message</label>
              <textarea rows="5" name="message" class="form-control" placeholder="Message" id="message" required data-validation-required-message="Please enter a message."></textarea>
              <p class="help-block text-danger"></p>
            </div>
          </div>
          <br>
          <div id="success"></div>
          <button type="submit" class="btn btn-primary" id="sendMessageButton">Send</button>
        </form>
      </div>
    </div>
  </div>

</html>
{% include "footer.html" %}
Summary of this topic
If you get used to it, you can make a small blog site in 2-3 hours, but I am a beginner and it took me 2 full days.
Future: I would like to add users to the model and add user registration and login functions.

コメント